
Sand Filter Multiport Valve Leak Troubleshooting
Multiport Valve Leak Troubleshooting
If your sand filter multiport valve is leaking, the location of the leak can help identify which component may need to be replaced.
1. Leak Around the Top Cover
If water is leaking around the outside of the top cover, the cover O-ring (6) may need to be replaced.
2. Leak from the Backwash Line or Port
If water is leaking from the backwash line or port, the spider gasket (8) is usually the component that needs to be replaced.
On some multiport valves, the spider gasket (8) and rotor (4) are supplied as a single component.
Please see the guide below for instructions on replacing the spider gasket.
3. Leak Through the Centre of the Valve
If water is leaking up through the valve stem in the centre of the handle, you will need to replace the following components:
-
2 × O-rings (2)
-
Handle washer (3)
-
Valve washer (10)
4. Leak from the Barrel Union
Water may also be leaking from the barrel union. The barrel union O-ring can normally be purchased separately. In the diagram below, it is shown as part of the barrel union set (16).
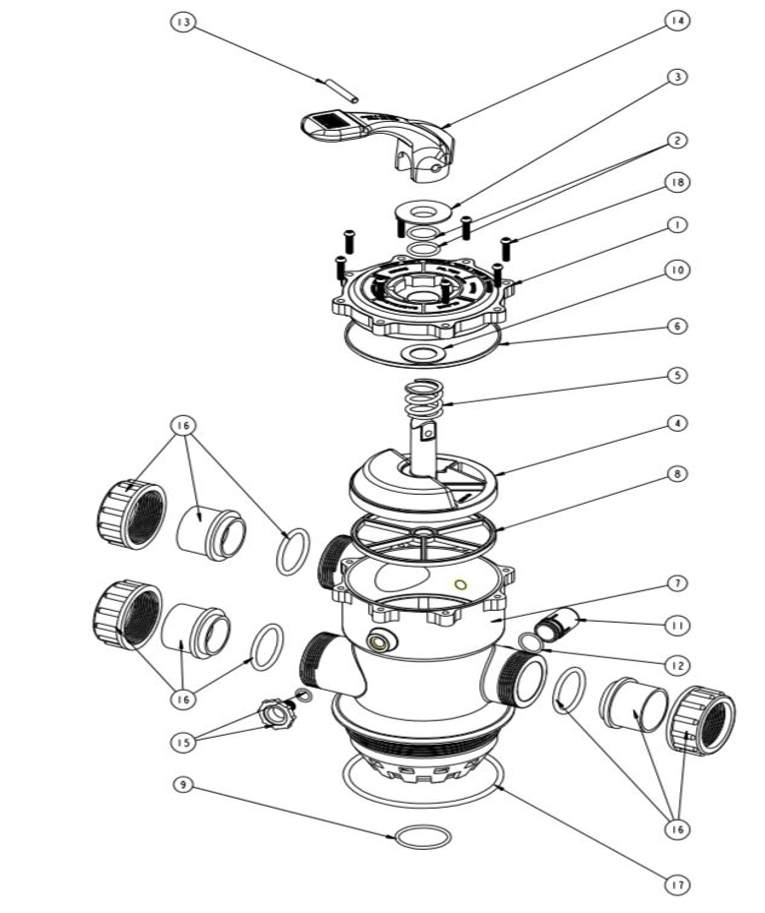
Spider Gasket Replacement for Sand Filter Multiport Valves (MPV)
It is important that the valve on top of your sand filter operates smoothly and correctly. Under normal conditions, the spider gasket may need to be replaced approximately every 5–10 years.
If your valve is losing water, a worn or damaged spider gasket may be the source of the leak. Check the backwash line for signs of leaking.
The spider gasket can be inspected by removing the top of the multiport valve.
Replacement Procedure
-
Turn the pump off and release all pressure from the system.
-
Place the selector handle in the “Winterise” position.
-
Remove the screws from the lid (1) and lift the lid off using the handle.
-
Remove the old spider gasket (8). If the gasket has been glued in place, carefully remove all remaining adhesive with a small screwdriver. Thoroughly clean the gasket groove before installing the new gasket, otherwise the new gasket may not seal correctly.
-
There are different approaches to securing the spider gasket in place. If you choose to use gasket adhesive, use it very sparingly. Apply only tiny dabs of superglue, silicone, or another suitable gasket adhesive into the grooves.
-
Allow the adhesive to cure before operating the valve. The minimum curing time is 2 hours, although 24 hours is recommended for maximum strength.
Replacing the Top Assembly
If you are experiencing problems with the handle, lid, or rotor, replacing the complete top assembly can be an easy solution.
The top assembly comes pre-assembled, so you simply need to remove the existing cover screws, remove the old assembly, and install the new one.
[Insert image here]
Replacing a Multiport Valve
If the valve body is cracked or the valve has multiple problems, it may be more practical to replace the complete Multiport Valve (MPV).